
Nothing is more satisfying than seeing an incubator filled with little fluff balls of happy, healthy baby chicks. This just doesn’t happen by sticking a bunch of eggs into an incubator though. Over the years I have learned some very clever chicken egg incubation tips that now set me up for a successful hatch.
In order to set yourself up for a successful hatch of chicken eggs, it requires being prepared with the essential incubator supplies, knowing how to handle fertile eggs both before and during incubation as well as being able to control the temperature and humidity at all times.

Tips Prior to Chicken Egg Incubation
A big part of the success in incubating chicken eggs happens before you even put the eggs into the incubator. Making sure that you are prepared with the essential supplies and have a properly functioning, sterile incubator will increase your odds of having a successful hatch.
1. Have Essential Incubator Supplies Before Receiving Eggs.
Get all the essential incubator supplies BEFORE you receive your fertile chicken eggs. Fertile chicken eggs begin to lose viability the closer they get to 10 days old. This can become a problem, especially with shipped eggs.

Shipped Eggs Already Have a Lower Hatch Rate Due to Many Factors:
- By the time shipped eggs arrive, they can already be up to one week old.
- Eggs are jostled and could even be dropped during transportation.
- Shipped eggs also need to rest for 24 hours prior to incubation. (I will explain more on this later.)
You don’t want to have to wait an additional day on top of this because you realize you do not have all of your incubator supplies.
| ESSENTIAL SUPPLIES | WHAT SUPPLY IS USED FOR |
|---|---|
| INCUBATOR | This is used to incubate your chicken eggs. |
| HYGROMETER WITH PROBE | used to measure temperature and humidity inside the incubator. You will also need this to calibrate your incubator prior to use. |
| SPONGES | are used to increase humidity inside incubator |
| NON-SKID LINER | to place on incubator floor so newly hatched chicks will not slip or develop “splayed legs.” |
| DISTILLED WATER | is used to fill the reservoirs to maintain proper humidity level. Distilled water is purified and free of minerals. Tap water can cause mineral build-up inside which can breed bacteria. |
| EMPTY TOILET PAPER ROLLS | (for some models) are used as placeholders, to hold eggs upright on days 1-18, if you do not have enough eggs to fill a row. |
| CANDLING LIGHT | for checking to see if the eggs are developing. |
| CALENDAR | to keep track of the 21 day embryo development. |
| PENCIL | to mark the air sac at the top of the egg and make any notes on your calendar. |
2. Calibrate Incubator Prior to Use

It is always a good idea to calibrate your incubator prior to using it, even if you have used it last hatching season. Just having the temperature off by 1 degree can affect your hatch rate.
Have a second thermometer and hygrometer to compare your built in incubator temperature to. Read your manufacturers recommended settings for incubation temperature and humidity for your specific model and make any changes that are necessary.
What is the recommended humidity for incubating chicken eggs in a forced-air and still-air incubator?
“Recommended humidity for incubating chicken eggs in both a forced-air and still-air incubator for days 1-18 is 60-65% relative humidity. Recommended humidity after day 18 is 70-75%.“
HOW TO USE AN INCUBATOR TO HATCH CHICKEN EGGS

I have found that incubators that have a dial for the temperature are very sensitive. If you need to change the temperature, only rotate the dial a very small amount. Wait 1/2 hour and then read the temperature.
What is the recommended temperature for incubating chicken eggs in a forced-air and still-air incubator?
“Days 1-21: Recommended temperature for hatching chicken eggs in a forced-air incubator is 99-99.5 degrees Fahrenheit. Still-air incubator recommended temperature is a little higher, 100.5 degrees.“
HOW TO USE AN INCUBATOR TO HATCH CHICKEN EGGS
3. Clean Incubator Prior to Use

Cleaning your incubator prior to use is very important. Even if you cleaned it prior to putting it away after your last hatch, it can still be dirty from sitting for several months.
I have found that the best way to clean an incubator is with apple cider vinegar and a clean sponge or washcloth.
It’s very simple. Moisten your sponge with some apple cider vinegar and do a thorough wipe down of your incubator.
Take special care when cleaning by the motor and any incubator wires.
Apple Cider Vinegar, ACV, has antibacterial properties that will kill any harmful bacteria and it will not harm your baby chicks.

4. Run Incubator Full 24 Hours Prior to Adding Chicken Eggs
Whether it is a new incubator or it has been in storage, run the incubator for a full 24 hours prior to adding your chicken eggs. It would be devastating to find out 8 hours into incubating your rare chicken eggs that you have a defective or broken incubator.
Tips Before Placing Eggs Into Incubator
Once you receive your fertile chicken eggs they need set for a period of time and pass a few tests before they can be added to the incubator. If they pass these inspections and set for the required amount of time, then they are ready for the incubator.
5. Inspect to See if Air Cells are Intact
Eggs contain an “air sack” or “air cell” between its two membranes, usually attaching at the larger end of the egg. This air cell is filled with oxygen. The developing embryo uses this oxygen and expels carbon dioxide into this space. If the air cell is not attached to the fat end of the egg or if it becomes detached, chicks very often will not survive a hatch.
Shipped eggs are prone to developing detached air cells. This is because they are jostled quite a bit during transportation.
What Does a Detached Air Cell Look Like?
To check for a detached air cell, while in a dark room, hold a flashlight up to the narrow part of the egg. Very gently rock the egg back and forth. If the air sac at the top of the egg moves when you do this, the air cell has become detached.
6. Let Shipped Eggs Set 24 Hours Before Incubation

How Long do Eggs Need to Rest Before Incubating?
- Shipped eggs should rest, “pointy side down,” for 24 hours before placing them into the incubator. This is so the air bubbles that developed from being jostled during transportation can settle at the top of the egg.
- Locally purchased fertile eggs do not need to rest prior to incubation. As long as they are room temperature, they can be put straight into the incubator.
- While fertile eggs are resting, they should be rotated 45 degrees every 6 hours.
- How to Incubate Eggs With Detached Air Cells
- Do not rotate eggs with detached air cells the first 24 hours.
- Keep them in an upright position, “pointy side down.”
- After 24 hours, recheck by candling.
- Sometimes this is sufficient for it to reattach.
- If the air cell is still detached, place it in the incubator (keeping them in an egg carton with pointed side down) with your other eggs, but wait 2-3 days before rotating them. You will have to manually rotate your other eggs.
- After the 3rd day, recheck.
- Hopefully by day 4 it has reattached. But if not, go ahead and hook up your automatic turner. Many times, it’s the embryos with detached air cells that start off ok, but stop developing.
- I usually wait until day 10 or 14 of candling before I discard any eggs that I am unsure about. If it isn’t too bad, the chick might be able to make it.
7. Inspect Eggs for Fine Cracks
Fine cracks or “hairline cracks” are not readily seen when looking at an egg. But if you candle the egg, (hold a flashlight up to it in a dark room) you can visibly see tiny, fine cracks in the shell of the egg. Eggs that have fine cracks in them have a decreased chance of hatching.
When candling these eggs on day 3 you will see blood vessels begin to develop, but many times by day 7-10 of candling, these stop developing and you will see a “blood ring,” or “ring of death.”
What Does a Blood Ring in an Egg Mean?
A blood ring occurs when blood vessels stop developing and pull away from the embryo. They begin to decompose and float to the top of the egg, forming a “ring of death.” If you see a blood ring in an egg, it means that the once developing embryo has died.
One reason that eggs with fine cracks are less likely to hatch is because they are prone to becoming contaminated. Eggs are very porous so bacteria can easily pass through the shell and into the egg through fine cracks.
8. All Eggs Should be Room Temperature Before Placing Into Incubator

Can I Put a Cold Egg Into an Incubator?
If you are collecting fertile eggs on a cold winter day for incubating, place them on your counter and wait a full 8 hours to make sure that the egg is room temperature before placing it into the incubator. All eggs should be room temperature before placing them into the incubator.
Farm fresh eggs have a protective coating on them. This is also referred to as a “bloom” or “cuticle” of the egg. This bloom protects the egg from bacteria passing into it. This is why it is best not to wash farm fresh eggs when you get them. The protective bloom will keep them fresher for a longer period of time.
If you place a cold egg into a warm, moist incubator, it will sweat. This sweat will wash some of the bloom off of the egg, predisposing it to bacteria passing through the pores of its shell.
This is also why you want to use (eat) chicken eggs within 2 hours of removing them from your cold refrigerator. Cold eggs will begin to sweat when removed from the refrigerator. If you leave once refrigerated eggs out long enough, bacteria will begin to contaminate the eggs.
Read my article below for more information on best storage tips for your chicken eggs.

Tips to Control Temperature and Humidity
Being able to control the temperature and humidity is vital for a good hatch rate. If the temperature is either too hot or too cold or if the humidity is too high or too low it can cause problems with the embryonic development and even cause death.
9. Add a Wet Sponge to Incubator to Increase Humidity

Incubators have reservoirs to add water to during incubation. The first 18 days of incubating chicken eggs humidity should be around 60-65%. This can usually be done by filling just one of the reservoirs. If necessary, fill the second reservoir.
For days 18 – hatch day, humidity needs to be increased to 70-75 %. I find that this is sometimes difficult to maintain, even if I have both channels filled with water.
Warm Water Trick for Hatching Eggs – Simple Way to Increase Humidity in an Incubator
By adding a wet sponge into the incubator, next to the eggs, I have no difficulties maintaining the proper humidity. It makes it a lot easier to add water too. Most incubator water channels are under the eggs. In order to add water to these models you have to remove the eggs.
If you need to increase the humidity, use the warm water trick for hatching eggs. Just add warm (not hot) water to the sponge through the straw. (See below.)
10. Use Vent Hole to Add Water to Incubator

If you have a vent hole in the top of your incubator, place a straw through the top and a sponge directly underneath it. This is especially helpful during “lockdown,” days 18-21. Use a syringe, fill it with distilled water and add it to your incubator through the straw.
Warm Water Trick for Hatching Eggs
Step 1: Warm some distilled water in the microwave. It should be warm to the touch, but not hot.
Step 2: Open the vent hole in your incubator and place a straw through the hole. Lower the straw until it barely touches the sponge below it.
Step 3: Use a syringe and slowly add warm water through the straw.
Step 4: Give your hygrometer about a minute or two to give you the updated humidity before adding anymore warm water. You will find that the humidity level rises much quicker by adding warmed water instead of cold.
Step 5: Don’t forget to remove the straw so your eggs can get the oxygen supply that they need.
The vent in most incubators should be opened all the way the last days of incubation. This is to make sure there is sufficient airflow for the exchange of oxygen. So, make sure you remove the straw from the vent after using it to add water, so it does not interfere with airflow.
11. Drape End of Paper Towel into One Water Reservoir
Most incubators have reservoir channels on the bottom. If you are having trouble raising the humidity, drape the end of a wet paper towel into one of the channels and fill the reservoir.
Humidity is affected by the surface area that the water covers, so by using the paper towel to cover more surface area, it will increase the humidity level.

12. Avoid Opening Incubator During Lockdown

“Lockdown” occurs on day 18. This is when you stop rotating your eggs so the chicks can get in position to hatch. This is also the time when they will work on breaking through both membranes and “pip” through the hard egg shell.
Why Can’t I Open an Incubator During Lockdown?
If you open the incubator during this time, you are risking having a quick drop in the humidity level. If the humidity level drops and a chick has already “pipped” through its shell, you are likely to cause the humidity level to drop inside the egg as well.
When this happens, the chick can become “shrink wrapped” within the membrane. This causes the membrane to stick to the embryo, not allowing it to rotate within in it to “zip” out of the egg shell and hatch. Most of these chicks will die.
13. Open Incubator in Humid Bathroom
If you find it necessary to open up the incubator during lockdown, bring the incubator into a humid bathroom. You can increase the humidity in a small bathroom quite easily by running hot water in your shower. Bring your hygrometer in the bathroom with you and wait until it reaches the same humidity as in your incubator before opening it up.
(For safety, keep your incubator away from any running water.)
14. Frequently Monitor Incubator Temperature

This may seem like a no brainer, but it needs to be said. I highly recommend getting an incubator with an alarm on it. You can set it so if it goes 1 or 2 degrees out of range an alarm will go off.
Temperature is SO IMPORTANT when incubating chicken eggs, even more important than humidity. Just going out of range for a couple of hours can kill an embryo.
Temperatures of 104.9 degrees for a short period of time can kill young embryos, less than 6 days old. Older embryos have a chance of still hatching, but are more likely to have malformations or be crippled.
A temperature of 95 degrees or below for a long period of time will also affect embryos. Usually the head and heart are large, but the trunk and limbs are small. These chicks usually will not hatch.
15. Take Caution Adjusting Temperature
For incubators with a dial to regulate the temperature, only turn the dial in very small increments. I have found that it only takes a very small turn to adjust the temperature. Wait for 1/2 hour before checking the temperature again. If needed, make another very small adjustment.
The optimum temperature to maintain for a still-air incubator is 100.5 degrees and 99.5 degrees for a forced-air incubator. The longer your can maintain this temperature throughout incubation the better your odds of a successful hatch.
Tips to Avoid Contamination
Taking steps to avoid eggs from becoming contaminated include making sure that anything that comes into contact with the eggs is cleaned. This includes your hands and flashlight during candling and the incubator itself. If eggs have hairline cracks, repairs should be made prior to incubation to avoid cross contamination.
16. Wash Hands and Flashlight Before Candling
Wash your hands with soap and water every single time before candling the eggs. This will help stop the transfer of oils from your hands to the eggs. Oils can clog the pores of the egg, limiting the transfer of oxygen.
Wipe down your candling flashlight with rubbing alcohol. This will decrease the chances of transferring any bacteria to the egg. Bacteria that binds to the egg shell can easily transfer through its pores and contaminate it, killing the embryo.
17. Discard Undeveloped Eggs by Day 14
By day 14 you should know if any of the eggs have stopped developing. The embryo should take up a large portion of the egg at this time and you should be able to see the active embryo moving. Discard any eggs that have stopped developing by day 14.
Why do Eggs Stop Developing or Not Develop?
- Infertile eggs will not develop.
- Eggs that have been subjected to too high or too low of humidity will stop developing.
- Too high or too low of temperature can stop developing.
- Eggs that have been contaminated will also stop developing.
- Fertile eggs can become contaminated if the bloom has been washed off prior to incubation and bacteria makes its way into the egg. This is especially common if washed with cold water. Cold water draws what’s on the outside of the egg (dirt, chicken poop) inside. If you must wash, do it with warm water.
It is important to discard undeveloped eggs at this time. Eggs that have stopped developing can be contaminated and the last thing you want is a contaminated egg to explode in your incubator, putting the rest of your eggs at risk of becoming contaminated.

18. Fixing Cracked Eggs
Cracked eggs are at an increased risk of becoming contaminated with bacteria. BUT if the crack is not too bad, you can repair it.
Do not place a cracked egg inside the incubator. Incubators are breeding grounds for bacteria and can very easily contaminate the egg. If it doesn’t become contaminated, fluids will leak from the egg causing the embryo to die.
If you choose to repair a cracked egg it needs to be done right away. The longer it is cracked, the greater the chances of bacteria entering the egg.
Before repairing a cracked egg, it needs to be cleaned with an antiseptic. The following methods can be used to repair a cracked egg:
| SUPPLIES THAT ARE OK TO USE | DO NOT USE THESE SUPPLIES |
|---|---|
| WHITE, UNSCENTED CANDLE WAX | SCENTED CANDLE |
| BEES WAX | SCOTCH TAPE |
| PLAIN, CLEAR NAIL POLISH | NAIL POLISH WITH WAX IN IT |
| ELMERS GLUE | TOXIC GLUES |
If using wax, melt it first and drip it on your cleaned egg. If using glue or nail polish, use a brush to gently cover the cracks. Do not use scented candles, nail polish that contains wax or toxic glues. All of these have additives that can kill the embryo. Scotch tape will initially stick, but will fall off when exposed to the temperature and humidity inside the incubator.
Carefully place the cracked egg back into the incubator and pay close attention to the development of the embryo during candling. If the embryo stops developing or if you do not see any development at all, discard the egg. You do not want to risk having the egg explode and contaminate everything else in the incubator.
19. Avoid Helping a Chick Hatch
As much as possible, avoid helping a chick hatch. I know it is so difficult to do this. You have waited 21 whole days to watch these eggs hatch! It’s hard to just sit back and do nothing.
If you find that you MUST intervene, try moving the incubator into a humid room, such as the bathroom. Run hot water in the shower to bring up the humidity level to match that inside the incubator.
This way you will not be running as high of a risk of exposing any of the other chicks that have already pipped through the shell to a drop in humidity. A quick drop in humidity will quickly shrink wrap a chick to the outer membrane, making it impossible to turn in the shell to “zip” out (hatch).
Another thing to keep in mind is that it is very easy for a chick to bleed to death if you help it hatch. Be prepared that you may not be able to save the chick. It is very difficult to see a chick struggle to breathe and bleed to death.
There is a chance that you may be able to help a chick hatch and is does survive! Chicks that are having difficulty hatching may be disabled or have other special needs, so be prepared to take on the responsibility of vet bills and extra care.
Not all chicks that you help hatch will have problems though. You may be successful in helping a chick survive and turns out to be strong and healthy! It is a risk you take.


Tips for Egg Rotation
For a successful hatch, it is important to rotate the eggs an odd amount of times at equal intervals throughout the day. Marking your eggs, setting a timer and having a calendar for a check off can make things easier for remembering. On day 18, stop rotating the eggs so the chicks can get into position to hatch.
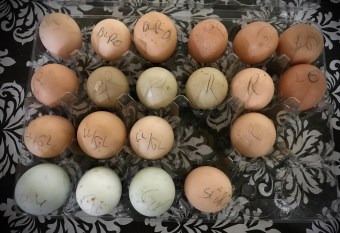
20. Mark Your Eggs
Draw an “X” on one side of the egg and a “O” on the opposite side. This will make it easier to remember if you rotated it. Make a calendar with a check off.
Pro Tip: If Monday night before you went to bed, your eggs were on “X,” make sure that on Tuesday night they are on “O.”
Nighttime is usually the longest time manually turned eggs will rest in the same position. Changing which side the egg rests overnight will decrease the likelihood of the chick sticking to the shell membrane and dying.
21. Set a Timer for Rotating Eggs
If you are manually rotating, set a daily timer on your watch so you do not forget. Eggs need to be rotated at least 5 times a day for a successful hatch.
It is so easy to get busy with other things in life. A little reminder alarm set on your watch will keep you on your toes!
FYI: A hen will rotate her eggs close to 100 times in a one day!
22. Rotate Eggs Odd Number of Times per Day

How Often Should You Rotate Chicken Eggs?
Always rotate the eggs an odd amount each day. For instance, rotate them 5 times or 7 times. This way, you will not have them setting on the same side two nights in a row. (The evening time being a little longer stretch of time that the eggs are not rotated.)
23. Stop Rotating the Eggs on Day 18
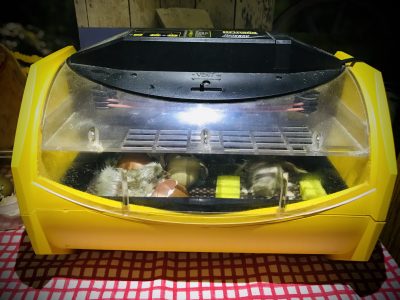
Day 18 is the beginning of “lockdown.” This is when you take out your automatic turner or stop manually rotating your eggs, fill up the second water reservoir to increase the humidity and do NOT open the incubator until the chicks have hatched. This is lockdown.
On day 18, if eggs had been in an upright position, lay them down on their side with the fat side slightly upright. This is where the air cell is and where the baby chick will eventually break out of the shell. I always like to place the eggs fat ends facing the incubator window so I can more easily see the chicks hatch.
Why do You Stop Turning Chicken Eggs?
The reason that we do not rotate the eggs on day 18 is because the chicks need time to get into the proper position to hatch. By keeping the eggs still, the chicks are able to figure out which way is up and break through the shell in the right position!
Tips for Healthy, Happy Chicks
You have done everything right during incubation and your baby chicks have finally hatched! Once the chicks hatch, it’s important to make their transition from egg to this world a good one too. This can be done by providing the best environment in the incubator, brooder and knowing what to do if things don’t go as planned.

24. Non-Skid Surface for Chicks

When chicks hatch, they get right up on their feet quickly and try to walk around. Having a non-skid surface for them to grip makes walking around so much easier and they are less likely to develop splayed legs with this material.
I use the padded liners that you can get for your kitchen cabinets. You can find this at your local dollar store!
Read my article below for more chicken supplies that you can get at your local dollar store!

This stuff works great in the chicken incubator! It’s like a little rubber mat with holes in it. Without it they are likely to slip and slide all over the incubator.
What Causes Splayed Chick Legs?
Chicks are prone to developing “splay legs,” if they are not provided with a non-slip surface. This is when a chicks legs slide outward and to the sides of their body due to being on a slippery surface. A chicks leg muscles do not develop properly causing the legs to stay spread out. This needs treated right away, while the chick is still young. If treated right away, this can be corrected within 1-2 weeks.
25. Have Brooder Box Set Up
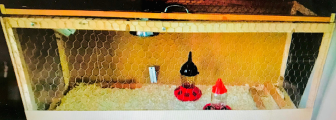
Have a brooder box set up prior to hatch day. A brooder box is a warm, safe enclosure that you will move the chicks into after they have dried off in the incubator. It takes the place of a mother hen. Read my article, 10 Simple Brooder Box Supplies You Need for Thriving Chicks for all the necessary supplies for a brooder box.
26. Only Move Dry Chicks to Brooder

Wait until the baby chicks completely dry off before moving them to the brooder. The incubator is the best environment for them for the first several hours after hatching. Once they become little fluff balls you can move them to their brooder.
No need to rush them to the brooder for food and water. Prior to hatching, chicks absorb their yolk, giving them enough energy to survive for their first 3 days.
27. Chicken Egg Incubation: Have a Backup Plan
Do you have a backup plan if something goes wrong? What happens if the power goes out? If you have a broody hen, this might work for you.
What happens if your incubator breaks down? Do you have a backup plan? If you have a second incubator, this might work for you.
Maybe you have a neighbor that has a broody hen or a spare incubator? Or maybe you have a backup generator to run your incubator?
These are not always options for the average person incubating eggs though. Try to have a backup plan in place before you get your eggs. The last thing you want is to lose your eggs that you looked so forward to seeing hatch!
CONCLUSION: 27 Clever Chicken Egg Incubation Tips for a Successful Hatch
Make sure you are prepared with all of the essential incubation supplies before you get your fertile chicken eggs.
Having your own “bag of tricks” to help care for the eggs prior to and during incubation as well as having a variety of different tips available to control your incubator temperature and humidity can only be a good thing.
By following all of these clever incubation tips, you are sure to have a successful hatch!
- Tips Prior to Chicken Egg Incubation
- 1. Have Essential Incubator Supplies Before Receiving Eggs.
- 2. Calibrate Incubator Prior to Use
- 3. Clean Incubator Prior to Use
- 4. Run Incubator Full 24 Hours Prior to Adding Chicken Eggs
- Tips Before Placing Eggs Into Incubator
- 5. Inspect to See if Air Cells are Intact
- 6. Let Shipped Eggs Set 24 Hours Before Incubation
- 7. Inspect Eggs for Fine Cracks
- 8. All Eggs Should be Room Temperature Before Placing Into Incubator
- Tips to Control Temperature and Humidity
- 9. Add a Wet Sponge to Incubator to Increase Humidity
- 10. Use Vent Hole to Add Water to Incubator
- 11. Drape End of Paper Towel into One Water Reservoir
- 12. Avoid Opening Incubator During Lockdown
- 13. Open Incubator in Humid Bathroom
- 14. Frequently Monitor Incubator Temperature
- 15. Take Caution Adjusting Temperature
- Tips to Avoid Contamination
- 16. Wash Hands and Flashlight Before Candling
- 17. Discard Undeveloped Eggs by Day 14
- 18. Fixing Cracked Eggs
- 19. Avoid Helping a Chick Hatch
- Tips for Egg Rotation
- 20. Mark Your Eggs
- 21. Set a Timer for Rotating Eggs
- 22. Rotate Eggs Odd Number of Times per Day
- 23. Stop Rotating the Eggs on Day 18
- Tips for Healthy, Happy Chicks
- 24. Non-Skid Surface for Chicks
- 25. Have Brooder Box Set Up
- 26. Only Move Dry Chicks to Brooder
- 27. Chicken Egg Incubation: Have a Backup Plan
- CONCLUSION: 27 Clever Chicken Egg Incubation Tips for a Successful Hatch

