
The Lifecycle of Chicken Mites: Why Winter Doesn’t Always Stop Them
Many chicken keepers assume winter “kills off” mites — but in real coops, cold weather often slows mite activity instead of stopping it. When birds spend more time indoors, bedding stays put longer, and ventilation gets reduced, mites can quietly hang on until spring.
Compliant note: This article is educational and focuses on practical ways to reduce mite pressure by improving your coop environment. If you’re seeing heavy mite activity or your flock seems unwell, consider contacting a poultry-savvy veterinarian or local extension office.
What Are Chicken Mites?
Chicken mites are tiny pests that typically spend most of their time in the coop environment — not living on the chicken 24/7. That’s why improving coop conditions (cleanliness, dryness, and airflow) is such a powerful way to reduce problems.
Chicken mites are also different from lice. Lice tend to stay on the bird, while mites often hide in cracks and come out when birds are resting. Understanding that difference helps you focus your effort in the right place: roosts, joints, seams, and nesting areas.
The Chicken Mite Lifecycle (And Why It Can Continue in Winter)
Mites develop through several stages. Winter can slow this cycle, but if your coop stays relatively protected and stable, the lifecycle can still continue. Here’s the simple version — and what it means for winter management.

1) Egg Stage: 5-7 Days
Mite eggs are often laid in hidden, protected places: cracks in wood, the ends of roost bars, under ledges, and in corners. Eggs don’t need a warm outdoor temperature — they need a sheltered place in the coop where conditions stay fairly steady.
Winter takeaway: If bedding and nesting material stay “stagnant” longer in winter, eggs may remain protected in those areas.
2) Larval Stage: 1-3 Days
The larval stage is brief and easy to miss. In winter, this stage may move more slowly, but it can still progress in a coop that stays relatively dry and sheltered. Because larvae are hard to spot, it’s best to focus on prevention routines rather than trying to “catch” larvae.
Winter takeaway: Consistent cleaning + dry bedding is your best defense against “invisible” stages.
3) Nymph Stage: 4-7 Days
Nymphs are more active and continue developing toward adulthood. This is where winter coop habits matter: if you’re cleaning less often, closing up vents more tightly, or letting bedding build up damp spots, you may be creating a steadier habitat.
Winter takeaway: Moisture + hidden crevices + long intervals between refreshes can allow mites to keep progressing.
4) Adult Stage: 10+ Days
Adult mites are the stage most keepers notice. Adults can survive in protected coop spaces and reproduce when conditions allow. Cold weather may reduce activity, but protected indoor microclimates can still support survival — especially in roost seams and corners.
Winter takeaway: Winter often turns mites into a “quiet problem” — not a gone problem.
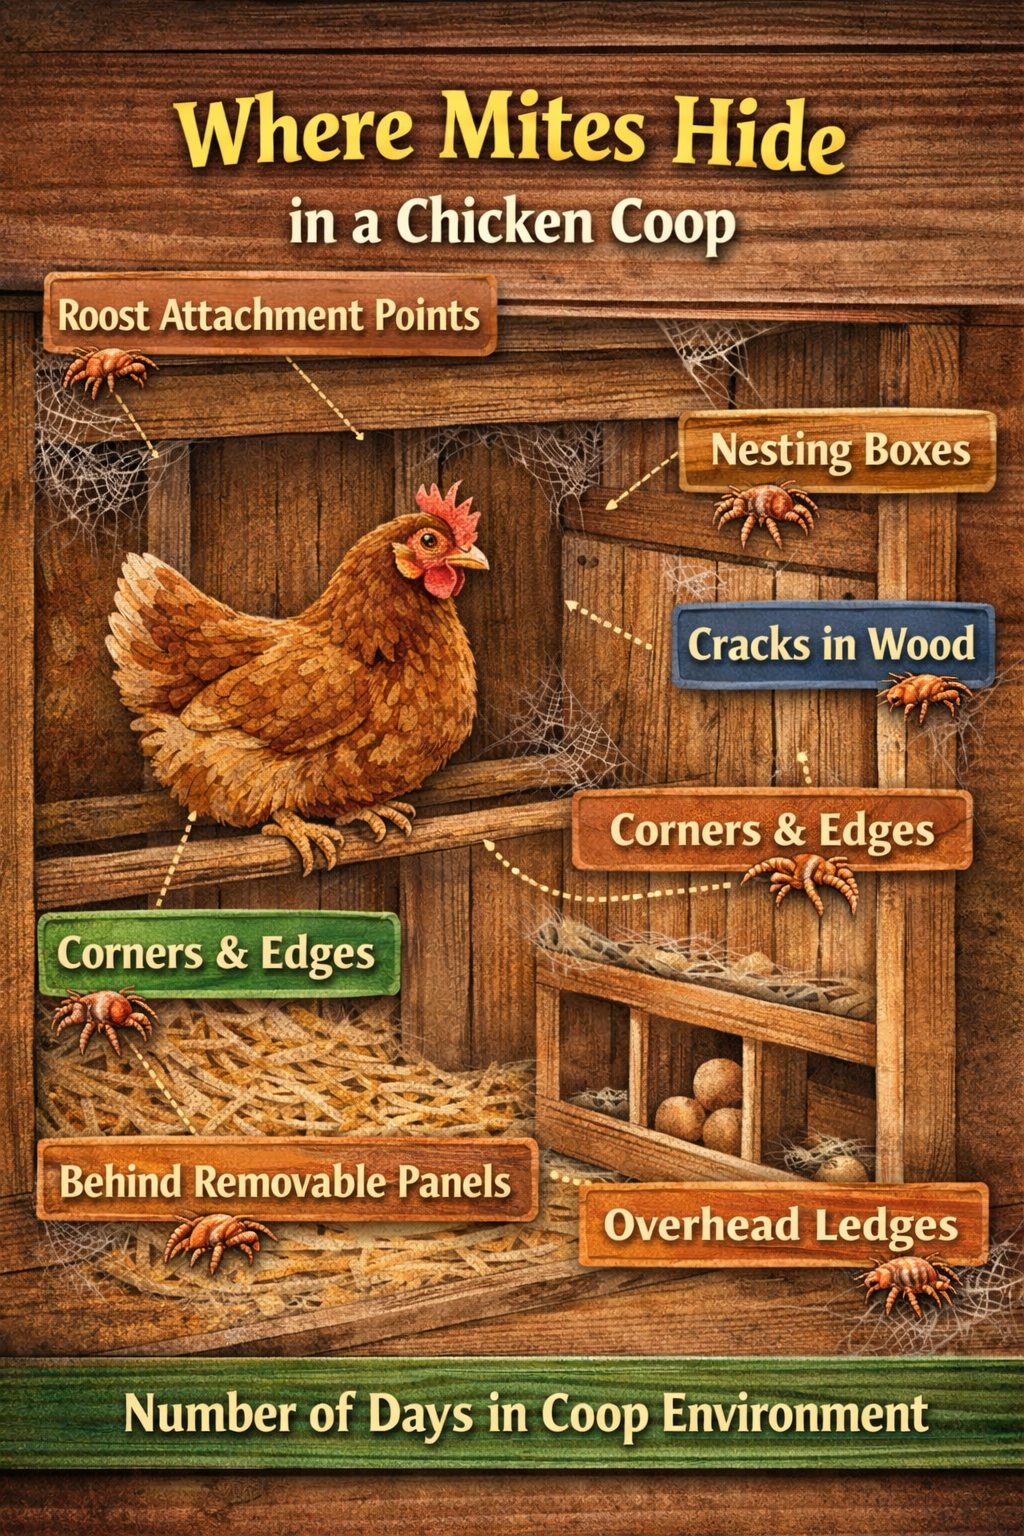
Where Mites Hide in Winter
If you want to reduce mite pressure, focus on the areas mites love most — especially in winter when birds spend more time inside.
High-priority hiding spots
Roost bar ends (where the bar meets the wall or supports)
Roost supports (brackets, ledges, and joints)
Cracks & seams (wood joints, screw holes)
Corners (especially where bedding packs down)
Often-overlooked winter zones
Nesting boxes (bedding that stays in place longer)
Behind panels (removable walls or doors)
Under ledges (shelves, lip edges)
Floor edges (where litter compacts)
Nesting Box Herbs: A Winter Routine That Supports Mite Reduction

Nesting Box Herbs are a simple, consistent add-on to your winter coop routine — especially for the “quiet mite season.” They’re designed to support a fresher nesting environment and pair naturally with bedding refreshes and roost-area checks.
Benefits that match this mite lifecycle article
- Supports mite reduction by keeping nesting areas and corners less inviting (especially when refreshed regularly)
- Encourages frequent bedding refreshes (a key step for interrupting eggs + early lifecycle stages)
- Helps the coop feel fresher between cleanings during winter confinement
- Promotes a calmer coop vibe (less winter stress = less feather picking and restlessness)
- Pairs perfectly with roost checks — add herbs after you scrape/clean and reset nesting material
How to use (winter-friendly): Refresh nesting material first. Then sprinkle herbs into nesting boxes and lightly in corners. Reapply whenever you clean or change bedding.
SHOP NESTING BOX HERBSWhy Winter Can Help Mites Stick Around
Here’s the surprising part: winter coop habits can accidentally create better conditions for mites. It’s not that winter “causes” mites — it’s that winter can make it easier for mites to remain protected.

Common winter patterns that can increase mite pressure
Less deep cleaning: It’s cold, wet, and time-consuming — so many coops go longer between resets.
Reduced ventilation: Closing vents to “keep heat in” can trap moisture.
Moisture buildup: Condensation dampens bedding and creates a stale environment.
More indoor time: Chickens roost inside longer each day, and roost zones get used harder.
Signs Mites May Still Be Present in Winter
These signs don’t confirm mites on their own, but they are good reasons to inspect your coop carefully — especially around roosts and seams.
Nighttime restlessness: birds settle, then pop up or move around more than usual.
Avoiding roosts: birds prefer floor sleeping or odd corners.
Increased preening: more time spent fussing with feathers.
Musty bedding: damp smell, compacted litter, or wet patches that don’t dry.
Winter Is the Best Time to Interrupt the Lifecycle
The best news: if mites are moving slower, your prevention steps often work faster. Winter is a great time to reduce hiding spots and tighten routines so you’re not chasing a spring blow-up.
Simple strategy: focus on the places mites lay eggs and hide (roost seams + nesting areas), then keep those areas dry and refreshed.
Practical, Compliant Ways to Reduce Mite Pressure in Winter
1) Make roost zones your “weekly focus”
Roost bars and their attachment points are a prime hiding spot. A quick weekly check and scrape helps reduce buildup and makes problems easier to spot early.
2) Keep bedding dry and predictable
Winter bedding often stays in place longer. That’s fine — as long as it stays dry and you remove damp spots quickly. Dry litter supports a less inviting environment for pests.
3) Ventilate high, avoid drafts at roost level
The goal is airflow that removes moisture without blowing directly across birds. Think: vents near the roofline, and calm air around roost height.
4) Refresh nesting material more often than you think
Nesting boxes are where birds spend quiet, close-contact time. Refreshing nesting material is a simple way to reduce “stagnant zones” where mites can hide and eggs can remain protected.
This is also where Nesting Box Herbs fit naturally — they work best as part of a regular reset routine.
5) Reduce winter stress (because stress stacks problems)
Stress doesn’t cause mites, but it can make winter issues harder: more feather picking, more restlessness, and less resilience. A calm coop routine (steady schedule, boredom busters, comfortable nesting areas) supports better winter behavior.
Warming Herbs for Chickens: Winter Comfort That Supports Overall Resilience

Winter mite reduction works best when you support the whole flock: a cleaner environment and steady winter routines. Warming Herbs for Chickens are a comforting seasonal blend that supports winter wellness habits that keep your flock steadier overall.
Benefits that support winter routines (and your mite-reduction plan)
- Supports winter comfort so birds stay steadier during cold-weather confinement
- Encourages healthy routines (consistent care is your best “mite pressure” strategy)
- Supports overall seasonal resilience during times of stress and weather swings
- Pairs well with coop resets — cleaner coop + calmer flock is a powerful combo
- Great seasonal companion to nesting refreshes and ventilation improvements
Why “Elimination” Isn’t the Goal — Management Is
In backyard settings, pests exist in the environment. The realistic win is to reduce mite pressure and keep your coop less welcoming: fewer hiding spots, less moisture, and better routines.
When you manage the environment consistently, you’re far less likely to get that frustrating “spring surprise.”
Spring Prep: Why What You Do in Winter Matters
As temperatures rise, mite activity can increase. If winter allowed mites to linger quietly, spring can feel like a sudden explosion. The good news is that winter prevention makes spring much easier.
Keep your winter wins: weekly roost checks, dry bedding habits, ventilation, and nesting refreshes.
Stay consistent: continuing herbs as part of your refresh routine can help keep your coop feeling clean and maintained.
Other related articles you may enjoy
FAQ
Does winter kill chicken mites?
Winter can slow mite activity, but it doesn’t always stop it. Protected coop areas (like roost seams, corners, and nesting boxes) can allow mites and eggs to remain sheltered until conditions improve.
Where should I check first in winter?
Start with roost bar ends, the joints where roosts attach, and coop corners. Then check nesting boxes and any seams where bedding packs down. Weekly quick checks are often more effective than occasional big cleanouts.
How do Nesting Box Herbs fit into mite reduction?
Nesting Box Herbs support mite reduction as part of an environmental routine: refresh bedding, then sprinkle herbs in nesting areas and corners to help keep those zones fresher and less inviting. They work best alongside cleanliness, dryness, and ventilation.
What’s the best mindset for long-term results?
Think “management,” not “one-time fixes.” Dry bedding, weekly roost checks, proper ventilation, and consistent nesting refreshes make the coop less welcoming for pests over time.
Quick winter routine: scrape roost zones weekly → refresh nesting material → sprinkle Nesting Box Herbs → keep ventilation moving moisture out.

